Line up the work. Let the agent run it, one step at a time.
The Target Project is a small local hub. You write a
workflow as a list of steps, and a coding
agent — Claude Code or free-code —
runs them in order, on one shared conversation. You watch the progress, approve
the steps that need a human, and reuse the step lists you repeat. This page walks
through it like a story.
The Target Project · documentación
Organiza el trabajo. Deja que el agente lo ejecute, un paso a la vez.
The Target Project es un pequeño hub local. Escribes un
flujo de trabajo como una lista de pasos, y un
agente de código — Claude Code o
free-code — los ejecuta en orden, en una sola conversación
compartida. Observas el progreso, apruebas los pasos que requieren una persona y
reutilizas las listas de pasos que repites. Esta página lo recorre como una
historia.
Meet The Target Project
Think of it as a to-do list for a coding agent. Each item on the list is a
step. The agent picks the first one, does it, then moves to the
next — and because every step continues the same conversation, the
agent remembers everything it did before.
You drive it from a web UI at http://127.0.0.1:8893 or from a
target command line. Under the hood it is a tiny, dependency-free
Node 24 service: a SQLite database, a hand-written HTTP server, and a bridge
to agent-webhook-bridge
(the thing that actually spawns the agent for each step).
The whole point is order and memory: steps run one after another,
not in parallel, and each new step resumes the previous session.
So a workflow reads as one long, continuous conversation — not a pile of
unrelated jobs.
Conoce The Target Project
Piénsalo como una lista de tareas para un agente de código. Cada
elemento de la lista es un paso. El agente toma el primero, lo
hace y pasa al siguiente — y como cada paso continúa la
misma conversación, el agente recuerda todo lo que hizo antes.
Lo manejas desde una interfaz web en http://127.0.0.1:8893 o desde la
línea de comandos target. Por debajo es un servicio
minúsculo, sin dependencias, en Node 24: una base de datos SQLite, un
servidor HTTP escrito a mano y un puente hacia
agent-webhook-bridge
(lo que realmente lanza el agente para cada paso).
La idea central es orden y memoria: los pasos se ejecutan uno tras
otro, no en paralelo, y cada paso nuevo retoma la sesión
anterior. Así, un flujo de trabajo se lee como una única
conversación larga y continua — no como un montón de tareas
sueltas.
The story in five moves
You create a workflow. Give it a name, pick a working folder, choose the agent runtime and its permissions. A dedicated agent and hook are created for it automatically.
You add steps. Each step is a plain-language task, with optional acceptance criteria, retries, a retry interval, and a “needs a human” toggle.
You press Start. The first step is sent to the agent. When it finishes, the next selected step is sent — always resuming the same conversation.
You watch and steer. A progress bar and a badge track the run. A step that needs review pauses the whole workflow and waits for your Continue.
It finishes. When every selected step is done, the workflow is complete — and it can tell you on Slack that it’s done.
That’s the whole shape. The rest of this page is the details — with screenshots.
La historia en cinco movimientos
Creas un flujo de trabajo. Le pones un nombre, eliges una carpeta de trabajo, elijes el runtime del agente y sus permisos. Se crea un agente y un hook dedicados para él automáticamente.
Agregas pasos. Cada paso es una tarea en lenguaje llano, con criterios de aceptación opcionales, reintentos, un intervalo de reintento y un interruptor de “requiere una persona”.
Presionas Start. El primer paso se envía al agente. Cuando termina, se envía el siguiente paso seleccionado — siempre retomando la misma conversación.
Observas y diriges. Una barra de progreso y un badge siguen la ejecución. Un paso que requiere revisión pausa todo el flujo y espera tu Continue.
Termina. Cuando todos los pasos seleccionados están listos, el flujo queda completo — y puede avisarte por Slack que terminó.
Esa es toda la forma. El resto de esta página son los detalles — con capturas de pantalla.
The web UI
The UI is a React app served by the hub. It has three tabs across the top —
Workflows, Templates and Settings
— and a small admin-token button on the right (the hub prints that token when
it starts; the UI remembers it for next time).
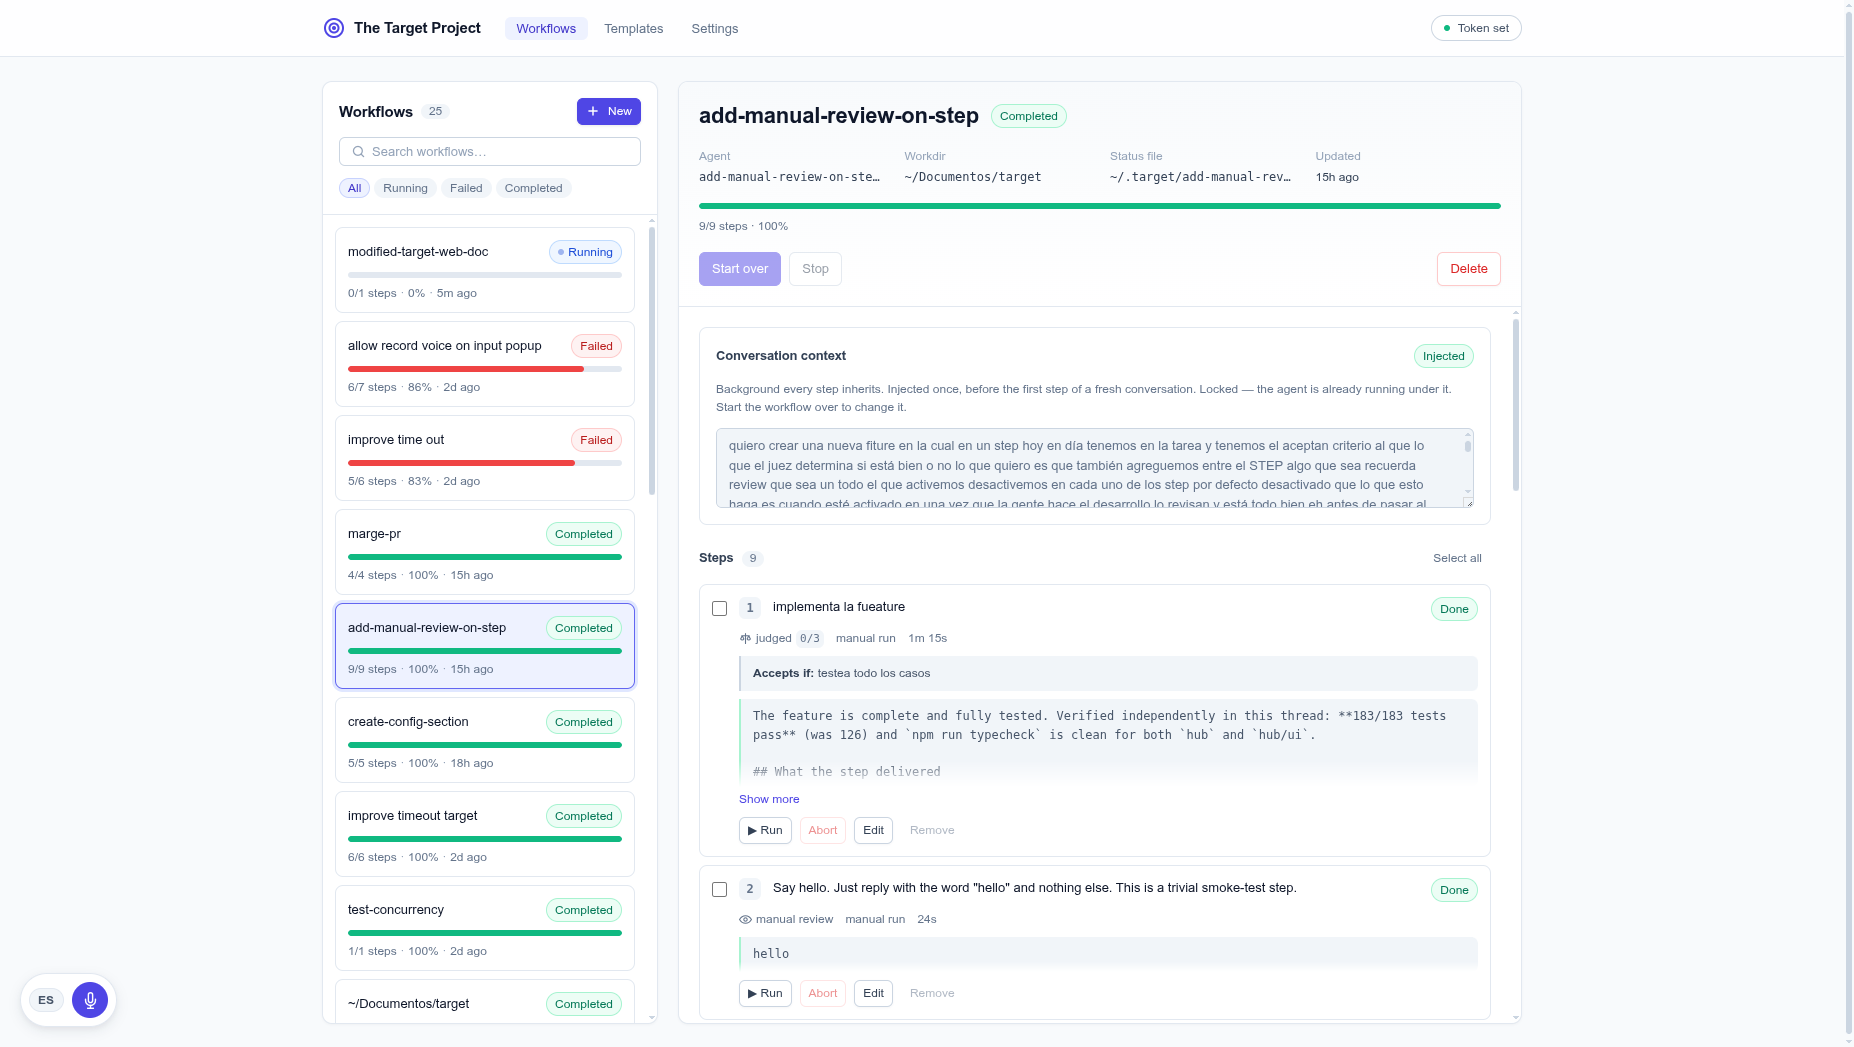
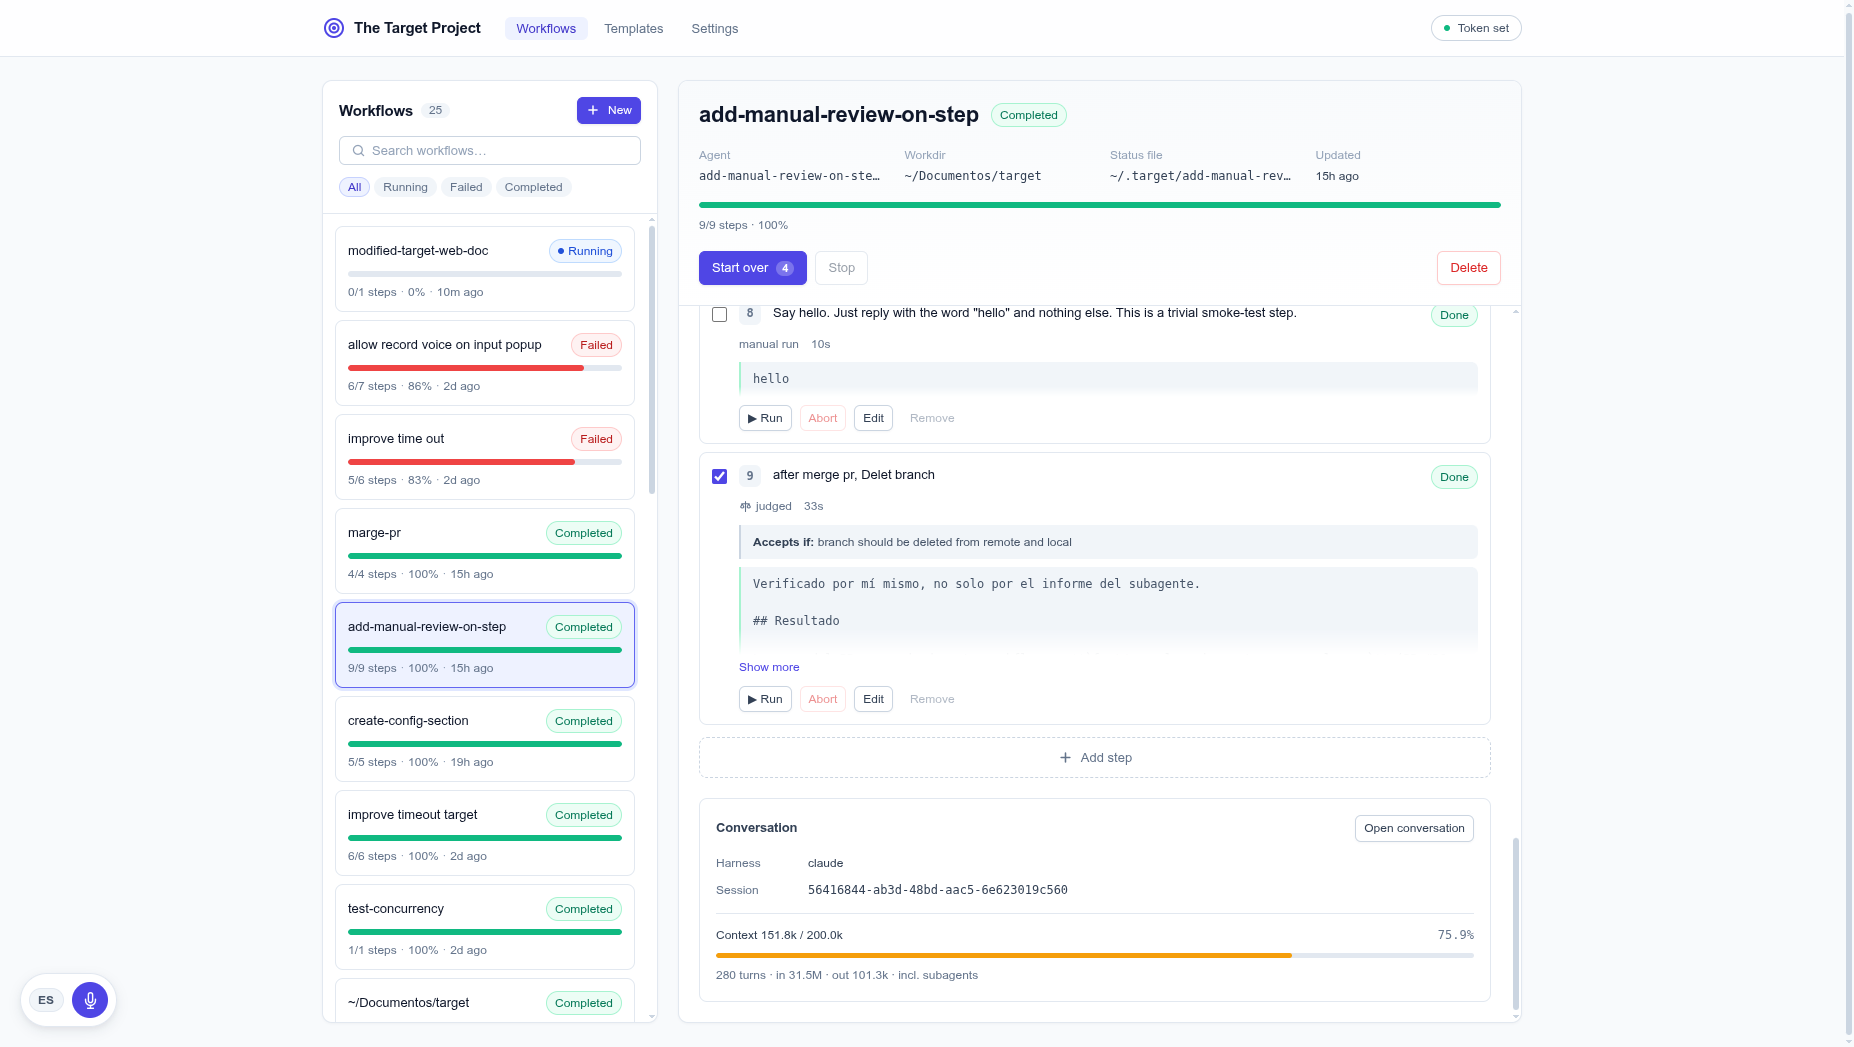
The Workflows tab. Left: the list, with search and status filters. Right: the selected workflow — its badge, progress bar, the conversation context block, and its steps. The brand reads “The Target Project”.
The list is sorted to put the work that needs you first: a workflow
waiting on a human sits above even a running one,
so the thing you most need to act on is at the top. Search filters by name or agent,
and the status chips let you narrow to just running, failed, and so on.
Pick a workflow and the detail pane opens with everything in the order the work
actually reads: the conversation context it starts from, the
steps that run, and the conversation those steps
produced. The page polls the hub every couple of seconds, so the progress bar and
statuses stay live — and the selected workflow lives in the URL
(#/w/<id>), so a reload or a shared link reopens it.
La interfaz web
La interfaz es una app en React servida por el hub. Tiene tres pestañas
arriba — Workflows, Templates y
Settings — y un pequeño botón de token de
administrador a la derecha (el hub imprime ese token al iniciar; la interfaz lo
recuerda para la próxima vez).
La pestaña Workflows. Izquierda: la lista, con búsqueda y filtros por estado. Derecha: el flujo seleccionado — su badge, su barra de progreso, el bloque de contexto de conversación y sus pasos. La marca dice “The Target Project”.
La lista se ordena para poner primero el trabajo que te necesita: un flujo
waiting (esperando a una persona) queda por encima incluso de uno
running, de modo que lo que más necesitas atender está
arriba. La búsqueda filtra por nombre o agente, y las fichas de estado te
dejan acotar a solo running, failed, etc.
Elige un flujo y el panel de detalle se abre con todo en el orden en que el trabajo
se lee: el contexto de conversación del que parte, los
pasos que se ejecutan y la conversación que
esos pasos produjeron. La página consulta al hub cada par de segundos, así
que la barra de progreso y los estados se mantienen al día — y el flujo
seleccionado vive en la URL (#/w/<id>), de modo que una recarga o
un enlace compartido lo reabre.
Create a workflow
Press + New and a dialog opens. It creates a dedicated agent and
hook for the workflow, so each one is fully isolated.
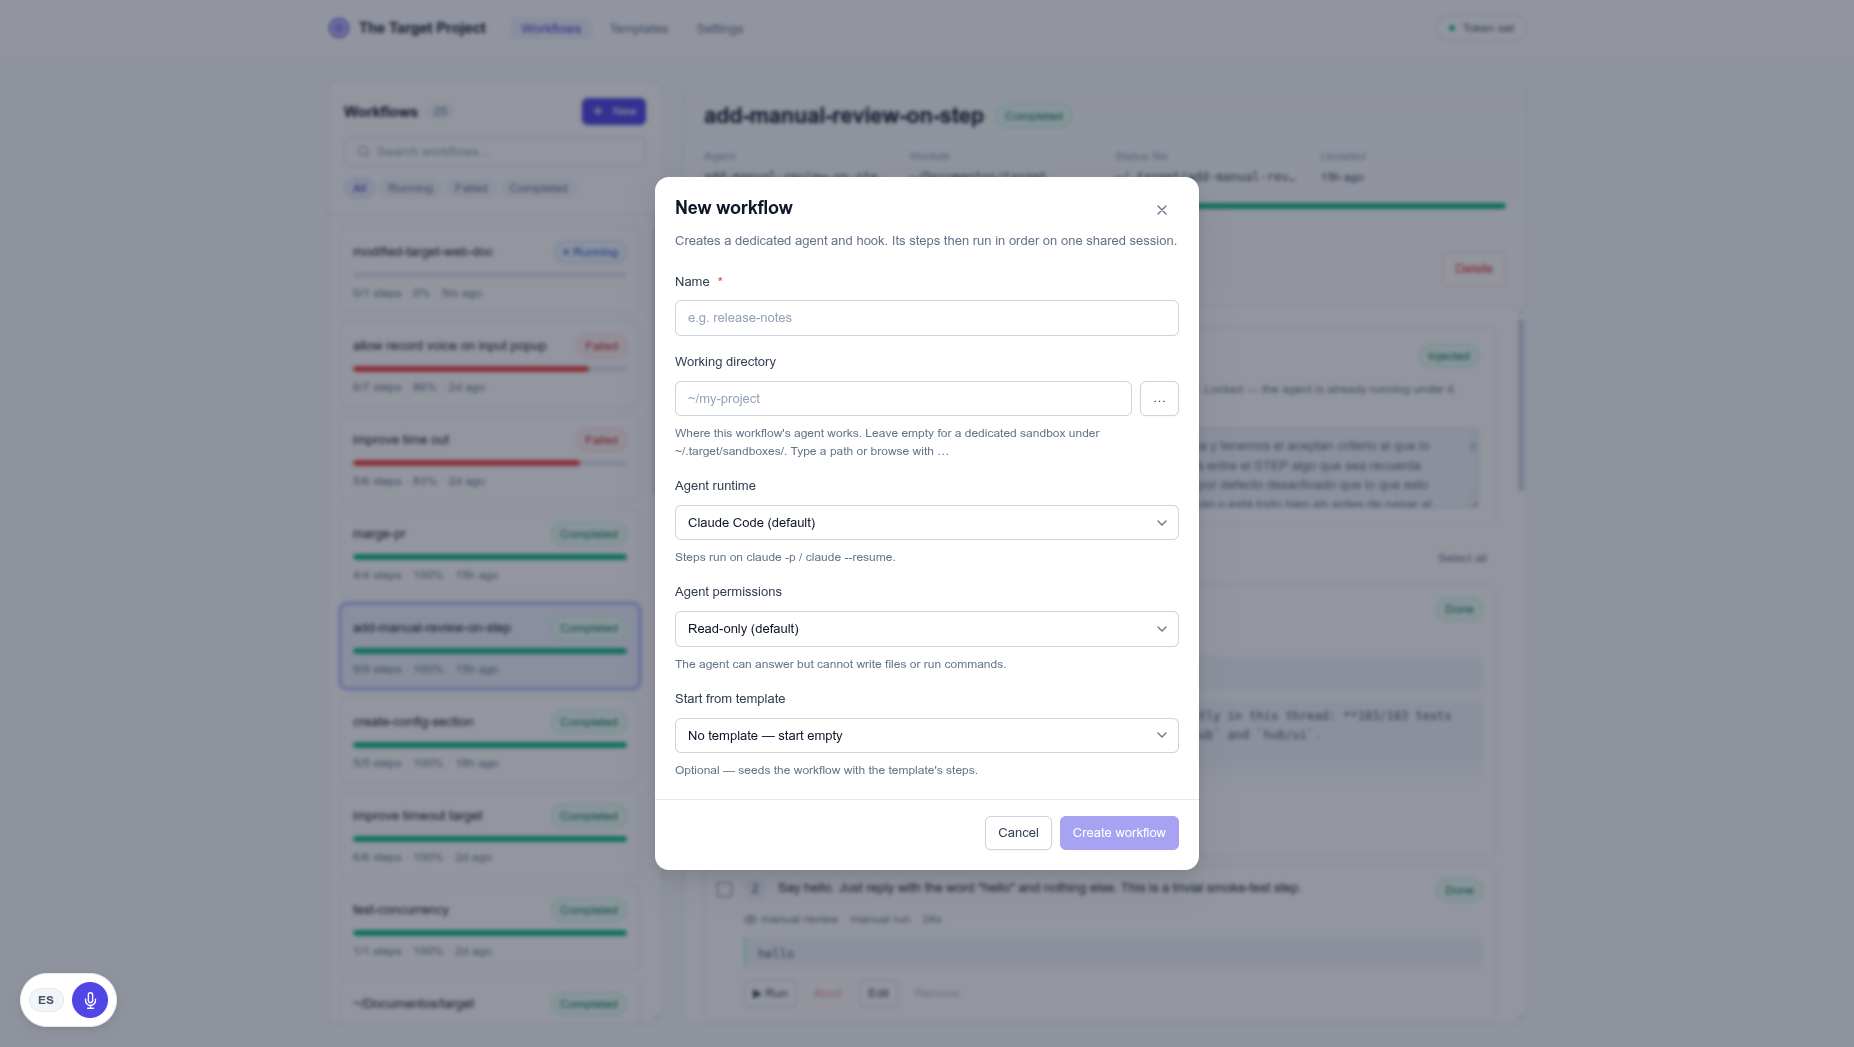
The New workflow dialog. Name, a working directory (typed or browsed), the agent runtime, the agent permissions, and an optional template to seed the steps from.
What you pick here
Working directory — where the agent works. Leave it empty for a private sandbox under ~/.target/sandboxes/, or point it at a real repo. The … button browses the server’s folders.
Agent runtime — Claude Code (the default) or free-code. The engine, judges and retries behave the same either way; only the spawned CLI and the session-id shape differ. The runner is fixed for the workflow’s life — to switch, make a new workflow.
Agent permissions — how much the agent may do. Read-only by default: it can answer but can’t write files or run commands. acceptEdits lets it write files inside its sandbox. bypassPermissions removes every check — so it asks you to confirm the risk first.
Start from template — copy a saved step list into the new workflow (more on templates below).
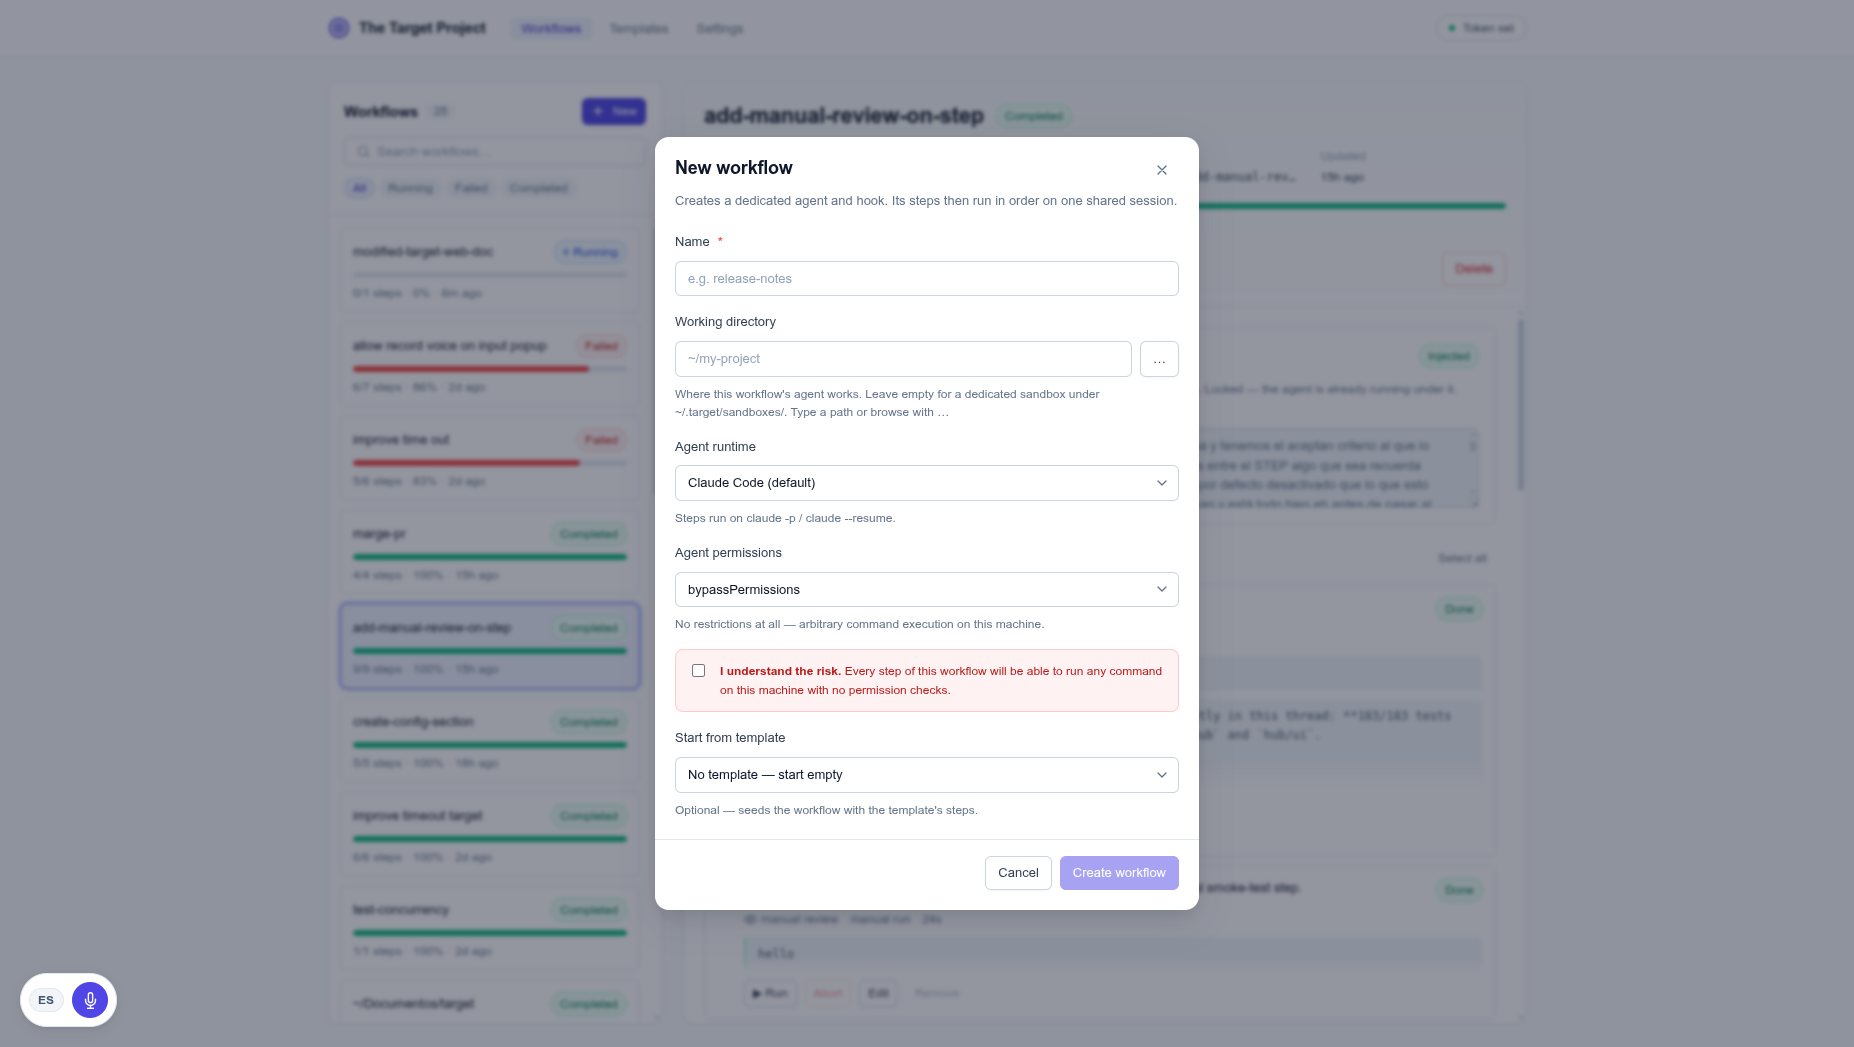
The bypass risk gate.bypassPermissions can’t be turned on by accident — you have to tick the box that spells out exactly what it means.
The conversation context is intentionally not part of this dialog. You add
it afterwards, from the workflow’s detail pane — see
The conversation.
Crear un flujo de trabajo
Presiona + New y se abre un diálogo. Crea un agente y un
hook dedicados para el flujo, de modo que cada uno está totalmente aislado.
El diálogo New workflow. Nombre, un directorio de trabajo (tecleado o explorado), el runtime del agente, los permisos del agente y una plantilla opcional de la que sembrar los pasos.
Qué eliges aquí
Directorio de trabajo — dónde trabaja el agente. Déjalo vacío para un sandbox privado bajo ~/.target/sandboxes/, o apunta a un repo real. El botón … explora las carpetas del servidor.
Runtime del agente — Claude Code (por defecto) o free-code. El motor, los jueces y los reintentos se comportan igual en ambos casos; solo cambian el CLI que se lanza y la forma del id de sesión. El runner queda fijo para la vida del flujo — para cambiarlo, crea un flujo nuevo.
Permisos del agente — cuánto puede hacer el agente. Read-only por defecto: puede responder pero no escribir archivos ni ejecutar comandos. acceptEdits le permite escribir archivos dentro de su sandbox. bypassPermissions quita todo chequeo — por eso te pide confirmar el riesgo primero.
Start from template — copia una lista de pasos guardada al flujo nuevo (más sobre las plantillas más abajo).
La confirmación de riesgo de bypass.bypassPermissions no se puede activar por accidente — tienes que marcar la casilla que explica exactamente qué significa.
El contexto de conversación, intencionalmente, no es parte de este
diálogo. Lo agregas después, desde el panel de detalle del flujo
— ver La conversación.
Steps and their statuses
A step is one task written in plain language. Each step has a checkbox (to choose
whether it runs on the next Start), a status badge, and a row of actions:
▶ Run (run just this step, out of order, on a fresh session),
Abort (force-fail a stuck step), Edit and
Remove.
The statuses, in the order a step can move through them
pendingqueuedrunningjudgingwaitingdonefailed
pending — sitting in the list, not yet run.
queued — sent to the agent, waiting its turn. Runs are serialized per working directory, so a second step on the same repo waits behind the first. Its timeout clock doesn’t start until it actually begins.
running — the agent is working on it. Next to the elapsed time you’ll see how lively it is: “active 8s ago” or “no activity 6m”.
judging — the step had acceptance criteria, finished its work, and is now self-evaluating the result.
waiting — the step was flagged for a human review and has finished its work; the workflow pauses until you press Continue. (See Human review & waiting.)
done — finished and accepted.
failed — the step (and therefore the workflow) ended in error.
badge = bar
The workflow’s badge and its progress bar are computed from the same step data, so they can never disagree. A run that ends with a step still failed ends the workflow failed — never completed with a red bar.
Run only the steps you tick
Start, Resume and Start-over send exactly the ticked steps. Tick nothing and the
button disables and tells you why, rather than silently doing nothing. A single
Start button maps to the right action for the status:
start when draft, resume when paused, restart
when completed or failed.
Los pasos y sus estados
Un paso es una tarea escrita en lenguaje llano. Cada paso tiene una casilla (para
elegir si se ejecuta en el próximo Start), un badge de estado y una fila de
acciones: ▶ Run (ejecutar solo este paso, fuera de orden, en
una sesión nueva), Abort (forzar el fallo de un paso
atascado), Edit y Remove.
Los estados, en el orden en que un paso los recorre
pendingqueuedrunningjudgingwaitingdonefailed
pending — en la lista, aún sin ejecutar.
queued — enviado al agente, esperando su turno. Las ejecuciones se serializan por directorio de trabajo, así que un segundo paso sobre el mismo repo espera detrás del primero. Su reloj de timeout no arranca hasta que realmente comienza.
running — el agente está trabajando en él. Junto al tiempo transcurrido verás qué tan activo está: “active 8s ago” o “no activity 6m”.
judging — el paso tenía criterios de aceptación, terminó su trabajo y ahora se autoevalúa.
waiting — el paso estaba marcado para revisión humana y terminó su trabajo; el flujo se pausa hasta que presiones Continue. (Ver Revisión humana y waiting.)
done — terminado y aceptado.
failed — el paso (y por tanto el flujo) terminó con error.
badge = barra
El badge del flujo y su barra de progreso se calculan con los mismos datos de los pasos, así que nunca pueden contradecirse. Una ejecución que termina con un paso aún failed termina el flujo failed — nunca completed con una barra roja.
Ejecuta solo los pasos que marques
Start, Resume y Start-over envían exactamente los pasos marcados. No marques
nada y el botón se deshabilita y te dice por qué, en lugar de no hacer
nada en silencio. Un único botón Start mapea a la
acción correcta para el estado: start en borrador,
resume en pausa, restart al estar completo o fallido.
Judge, retries and retry intervals
A step can carry an acceptance criterion — a short sentence
describing what a good result looks like. If it has one, finishing the work
doesn’t mark the step done. Instead the step enters a
judge phase: a second run, on the same session, asks the agent to
look at its own result and answer a yes/no verdict.
Accepted → the step becomes done and the engine moves on.
Rejected → the step is retried, with the judge’s feedback, until the retry budget runs out.
No criterion → no judge phase; the step is a plain one-shot.
Each step has a Max retries and a retry interval
(seconds to wait before each re-run). You set them when you add or edit a step.
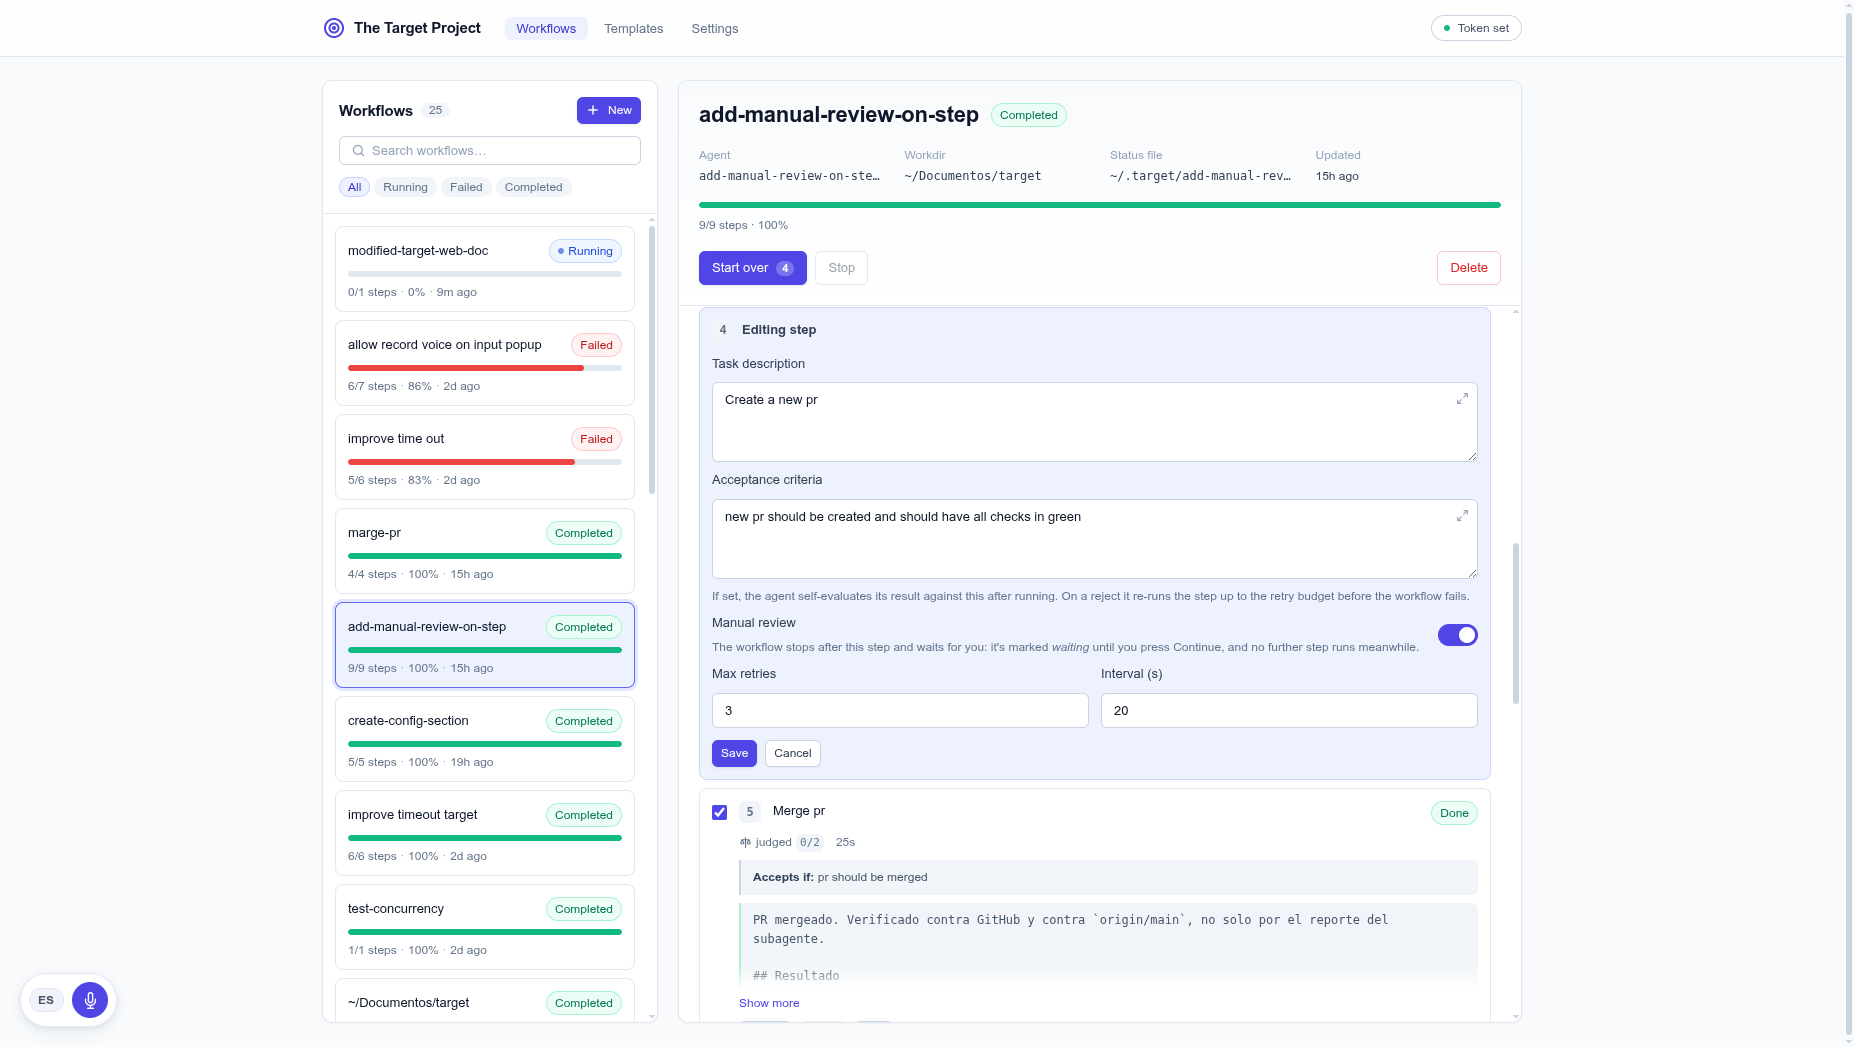
Editing a step. Task description, optional acceptance criteria, the Manual review switch, and Max retries / Interval (s). The interval only matters with more than one retry, so it’s disabled below that.
one retry budget, many causes
A judge rejection and a timeout both draw from the same retry budget. A step that times out with retries left is retried (the hung run is killed, the workdir lock freed, and the step re-dispatched on the same session with a note that the last attempt timed out) — only when the budget is spent does it fail for good. The retry count shows as retryCount/maxRetries next to the step.
Evaluador, reintentos e intervalos
Un paso puede llevar un criterio de aceptación — una
frase corta que describe cómo se ve un buen resultado. Si lo tiene, terminar
el trabajo no marca el paso como done. En su lugar el paso entra en una
fase de juez: una segunda ejecución, en la misma
sesión, le pide al agente mirar su propio resultado y dar un veredicto
sí/no.
Aceptado → el paso pasa a done y el motor continúa.
Rechazado → el paso se reintenta, con la retroalimentación del juez, hasta agotar el presupuesto de reintentos.
Sin criterio → sin fase de juez; el paso es una ejecución simple única.
Cada paso tiene un Max retries y un intervalo de
reintento (segundos de espera antes de cada reejecución). Los
configuras al agregar o editar un paso.
Editando un paso. Descripción de la tarea, criterios de aceptación opcionales, el interruptor Manual review y Max retries / Interval (s). El intervalo solo importa con más de un reintento, por eso se deshabilita por debajo de eso.
un presupuesto, muchas causas
Un rechazo del juez y un timeout consumen del mismo presupuesto de reintentos. Un paso que excede el tiempo con reintentos disponibles se reintenta (se mata la ejecución colgada, se libera el lock del workdir y se redespacha el paso en la misma sesión con una nota de que el último intento hizo timeout) — solo cuando el presupuesto se agota falla definitivamente. El contador de reintentos se muestra como retryCount/maxRetries junto al paso.
Require a human review — the waiting status
Some steps shouldn’t just run and move on — you want to look at the
result before the workflow continues. Turn on Manual review on a
step, and when that step finishes its work (and passes its judge, if it has one)
it does not become done. It becomes
waiting, and the whole workflow pauses right there.
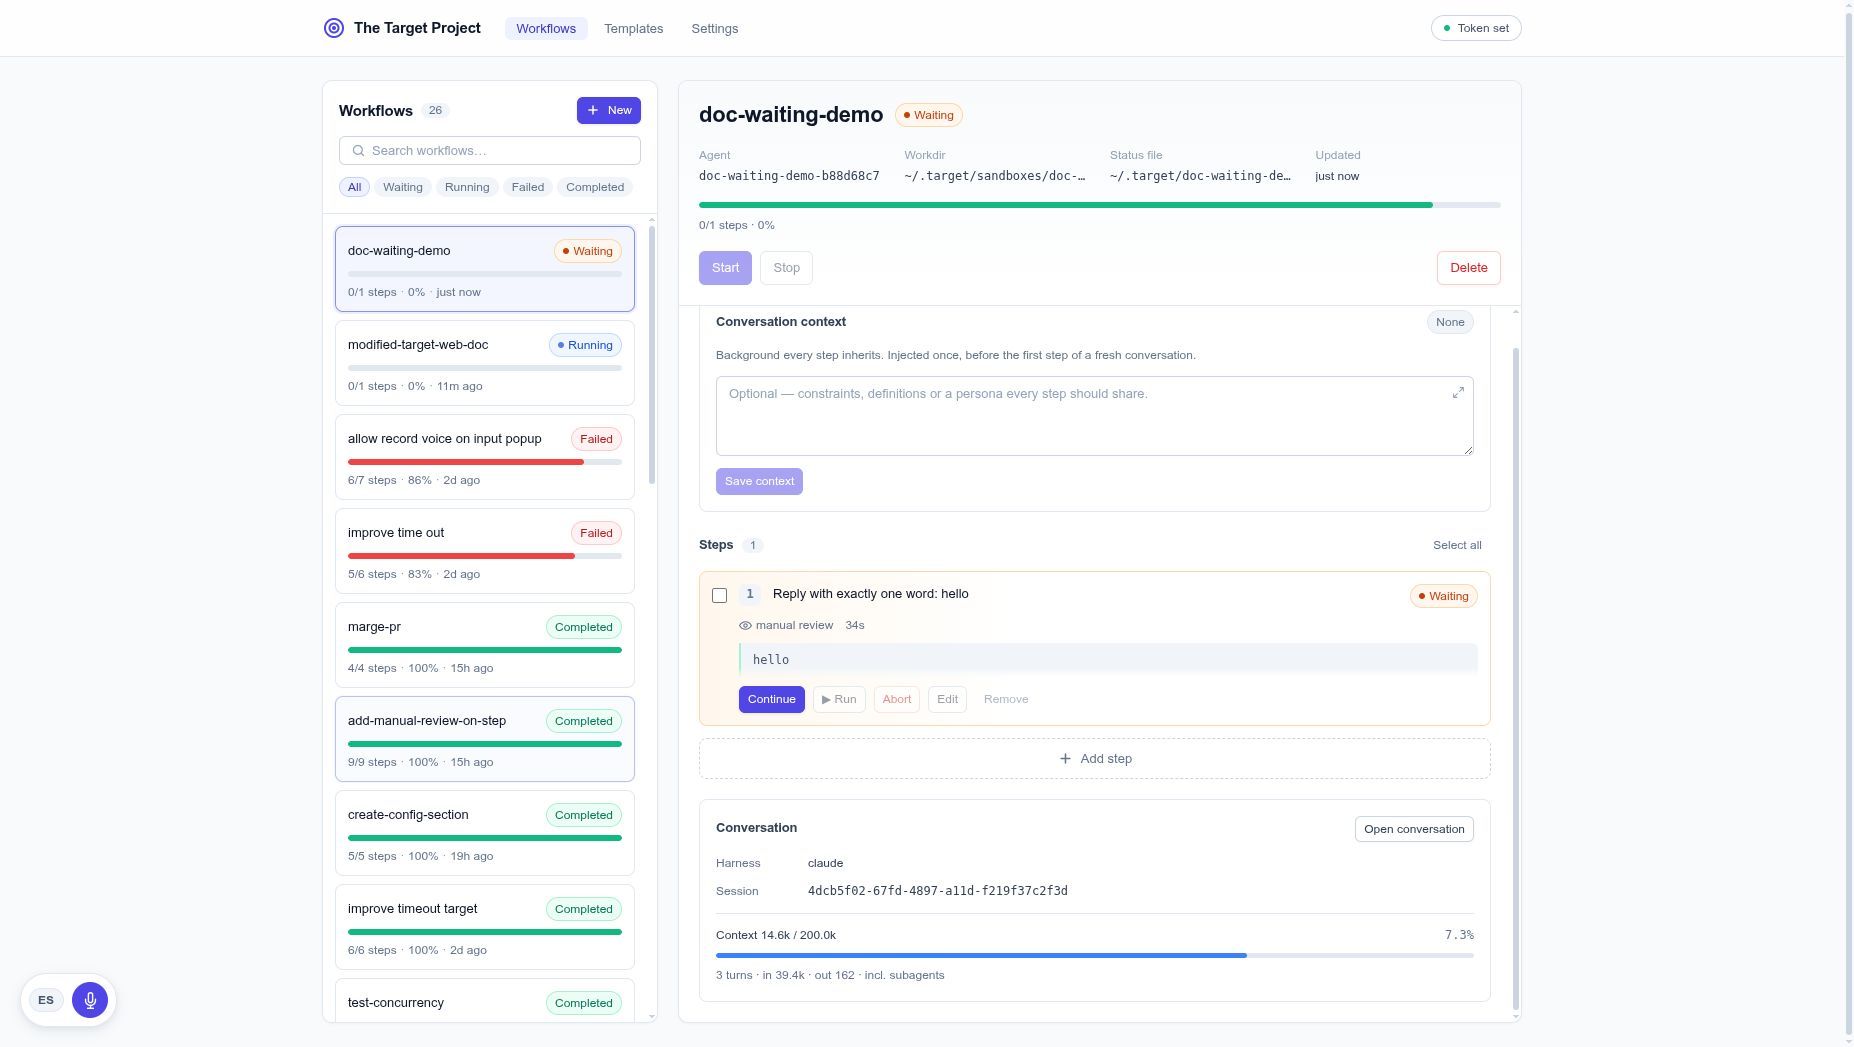
A step waiting for you. The waiting badge, the “manual review” tag, the result laid out for you to read, and a single Continue button. Nothing else runs until you press it.
How the gate behaves, in plain words:
Only accepted work waits. If the step fails, or its judge rejects it past the retry budget, it fails as usual — the gate never holds broken work.
Continue is the only way forward. While a workflow is waiting, Start is refused, the step can’t be edited or re-run, and the timeout watchdog leaves it alone — a human may take as long as they need.
Restart is the way out if you don’t want to approve. It resets the held step and runs it again.
It works on one-off runs too. Press ▶ on a gated step and it holds the same way; continuing it just settles the badge back instead of advancing a run.
heads up
If you’ve turned on notifications, the hub can ping you on Slack the moment a step starts waiting — so you don’t have to keep the UI open. The message names the workflow, the step and what to check. The notification is advisory: the hold is the feature; a failed delivery changes nothing.
Revisión humana — el estado waiting
Algunos pasos no deberían simplemente ejecutarse y continuar — quieres
revisar el resultado antes de que el flujo siga. Activa Manual review
en un paso, y cuando ese paso termine su trabajo (y pase su juez, si lo tiene) no
queda done. Queda waiting, y todo el flujo se pausa
ahí mismo.
Un paso esperándote. El badge waiting, la etiqueta “manual review”, el resultado dispuesto para que lo leas y un único botón Continue. Nada más se ejecuta hasta que lo presiones.
Cómo se comporta la puerta, en palabras llanas:
Solo el trabajo aceptado espera. Si el paso falla, o su juez lo rechaza más allá del presupuesto de reintentos, falla como siempre — la puerta nunca retiene trabajo roto.
Continue es la única forma de avanzar. Mientras un flujo está waiting, Start se rechaza, el paso no se puede editar ni reejecutar, y el watchdog de timeout lo deja en paz — una persona puede tomarse el tiempo que necesite.
Restart es la salida si no quieres aprobar. Resetea el paso retenido y lo ejecuta de nuevo.
También aplica en ejecuciones puntuales. Presiona ▶ en un paso con puerta y se retiene igual; continuarlo solo deja el badge asentado en lugar de avanzar la ejecución.
aviso
Si activaste las notificaciones, el hub puede avisarte por Slack en el momento en que un paso entra en waiting — así no tienes que mantener la interfaz abierta. El mensaje nombra el flujo, el paso y qué revisar. La notificación es informativa: la retención es la función; una entrega fallida no cambia nada.
Templates
If you keep writing the same sequence of steps, save it as a template.
A template is a reusable, ordered list of steps — with their acceptance
criteria, retries, retry intervals and manual-review flags — that you can use
to seed a new workflow or append to an existing one. Templates never execute
themselves; they’re just a blueprint.
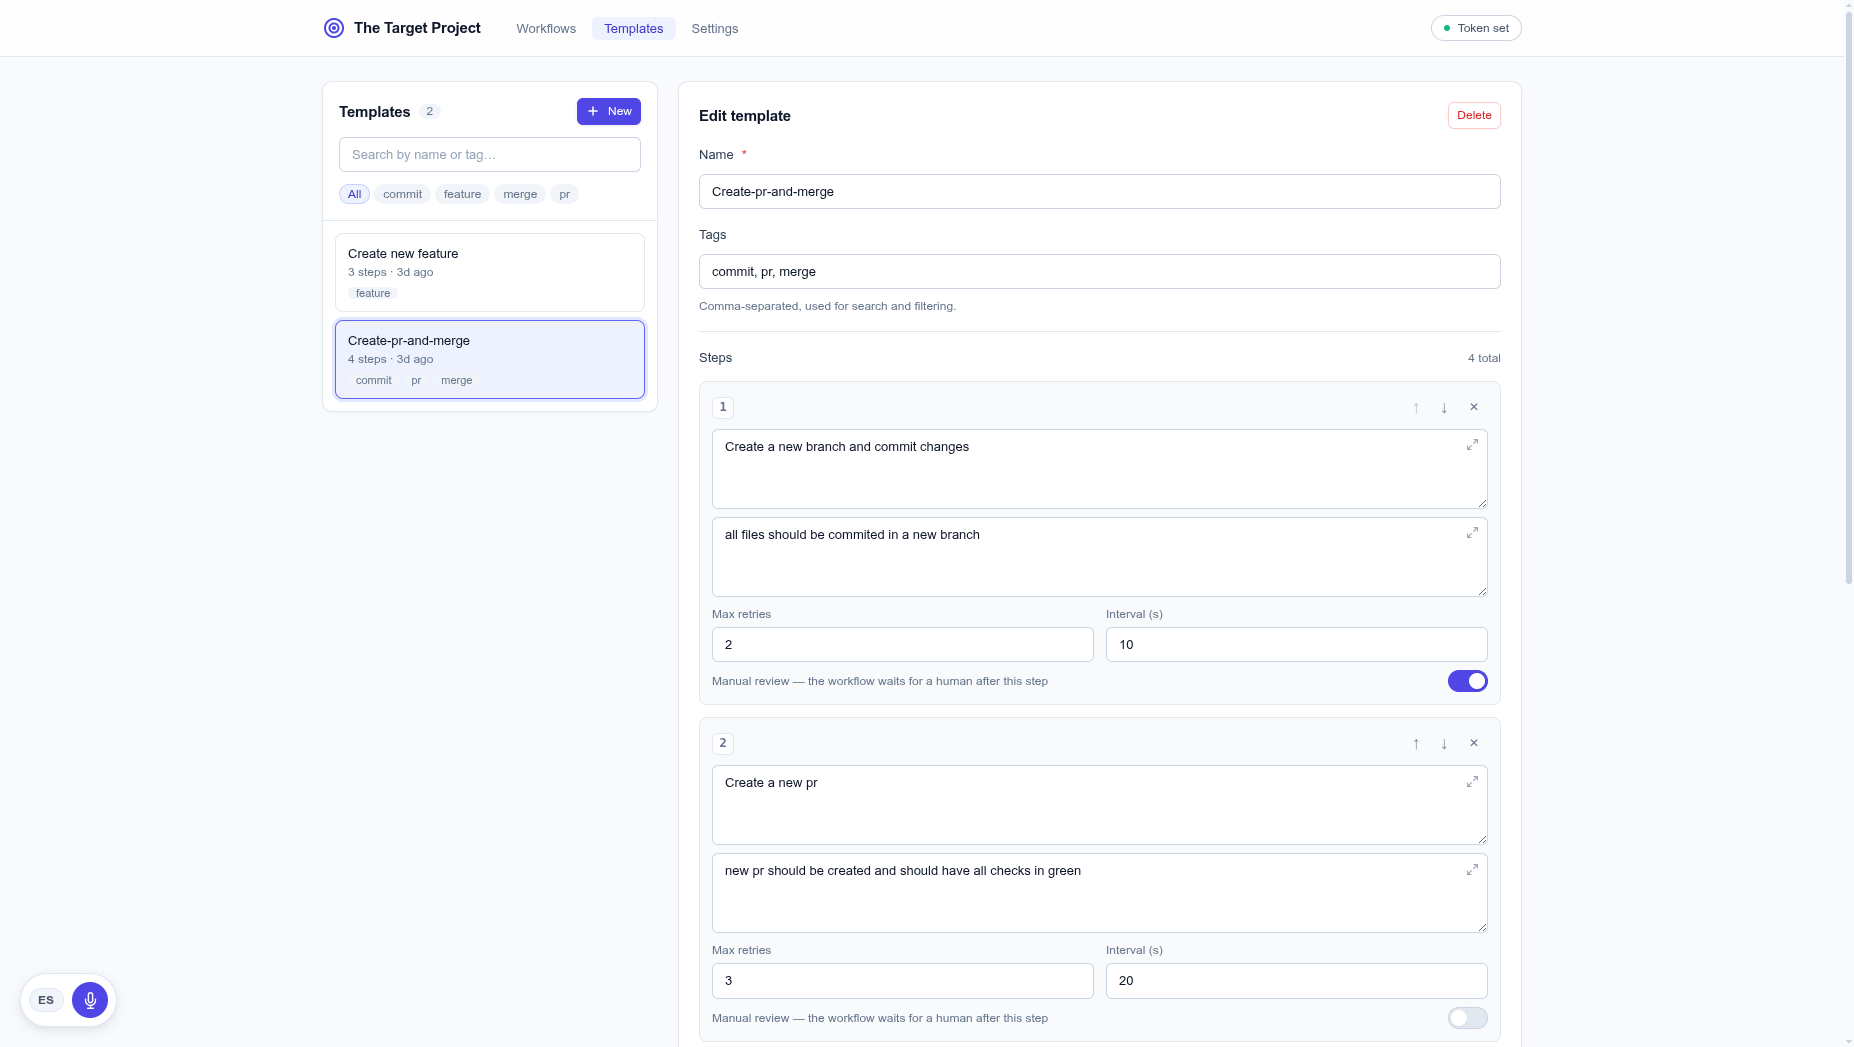
The Templates tab. Left: the list, with search and tag filters. Right: the editor — name, tags, and each step’s description, acceptance criteria, Max retries, Interval (s) and Manual review toggle. Reorder with the arrows, remove with ×.
Two ways to use a template:
Seed a new workflow — pick it in the Start from template field of the New-workflow dialog, and the workflow is born with those steps.
Append to an existing workflow — open Add step on a workflow, choose a template, and press Append. Steps whose description already exists are skipped, so you can’t double-add.
The manual-review flag travels with the step, so a checklist whose sign-off step is
gated stays reusable. Search filters by name or tag; the tag chips narrow to one
tag at a time.
Plantillas
Si sigues escribiendo la misma secuencia de pasos, guárdala como una
plantilla. Una plantilla es una lista ordenada y reutilizable de
pasos — con sus criterios de aceptación, reintentos, intervalos y
banderas de revisión manual — que puedes usar para sembrar un flujo
nuevo o agregar a uno existente. Las plantillas nunca se ejecutan por sí
mismas; son solo un plano.
La pestaña Templates. Izquierda: la lista, con búsqueda y filtros por etiqueta. Derecha: el editor — nombre, etiquetas y, para cada paso, su descripción, criterios de aceptación, Max retries, Interval (s) e interruptor de Manual review. Reordena con las flechas, elimina con ×.
Dos formas de usar una plantilla:
Sembrar un flujo nuevo — elígela en el campo Start from template del diálogo New-workflow, y el flujo nace con esos pasos.
Agregar a un flujo existente — abre Add step en un flujo, elige una plantilla y presiona Append. Los pasos cuya descripción ya existe se omiten, así que no puedes duplicarlos.
La bandera de revisión manual viaja con el paso, de modo que un checklist
cuyo paso de cierre está retenido sigue siendo reutilizable. La
búsqueda filtra por nombre o etiqueta; las fichas de etiqueta acotan a una
etiqueta a la vez.
One conversation, start to finish
A workflow is one continuous conversation on a shared session. Two blocks in the
detail pane are about exactly that: the conversation context it
starts from, and the conversation those steps produced.
Conversation context — the preamble
The context is optional background that every step should share — the
audience, constraints, definitions, a persona. It is injected once,
before the first step of a fresh run, so later steps (which resume the session)
already carry it and never need it repeated.
Once it’s been injected, the context is locked: the field
becomes read-only and Save is disabled, because the agent is already running under
it. To change it, start the workflow over — that resets the flag and starts a
fresh conversation, which re-injects whatever the context is by then. A badge shows
the state: injected, pending, or none.
The conversation block — the live session
The Conversation block. The harness and session id, a context-window meter (tokens used vs. the window, with a percentage that turns amber then red as it fills), the turn count and token totals — and an Open conversation button that opens a terminal already resuming this session.
Open conversation opens a terminal on this machine,
cd’d into the workflow’s working directory, running the
harness’s resume command (claude --resume <id> or
free-code --session <path>) so you can pick up the conversation
by hand.
Una conversación de principio a fin
Un flujo es una conversación continua en una sesión compartida. Dos
bloques del panel de detalle tratan exactamente de eso: el contexto de
conversación del que parte, y la conversación
que esos pasos produjeron.
Contexto de conversación — el preámbulo
El contexto es un fondo opcional que todos los pasos deberían compartir
— la audiencia, las restricciones, las definiciones, un rol. Se inyecta
una vez, antes del primer paso de una ejecución nueva, de
modo que los pasos posteriores (que retoman la sesión) ya lo traen y nunca lo
necesitan repetido.
Una vez inyectado, el contexto queda bloqueado: el campo se vuelve
de solo lectura y Save se deshabilita, porque el agente ya está corriendo bajo
él. Para cambiarlo, reinicia el flujo — eso resetea la bandera y arranca
una conversación nueva, que reinyecta lo que sea que el contexto tenga para
entonces. Un badge muestra el estado: injected, pending o
none.
El bloque de conversación — la sesión en vivo
El bloque Conversation. El harness y el id de sesión, un medidor de ventana de contexto (tokens usados vs. la ventana, con un porcentaje que pasa a ámbar y luego a rojo al llenarse), el conteo de turnos y los totales de tokens — y un botón Open conversation que abre una terminal ya retomando esta sesión.
Open conversation abre una terminal en esta máquina,
posicionada con cd en el directorio de trabajo del flujo, ejecutando el
comando de reanudación del harness (claude --resume <id> o
free-code --session <path>) para que retomes la conversación
a mano.
Settings & notifications
The Settings tab holds hub-wide preferences. Right now there’s
one section: Notifications. Flip the master switch on, enter your
Slack username, and Save — the hub will message you (a direct message on
Slack) when a step starts waiting for your review, and again when a
workflow finishes.
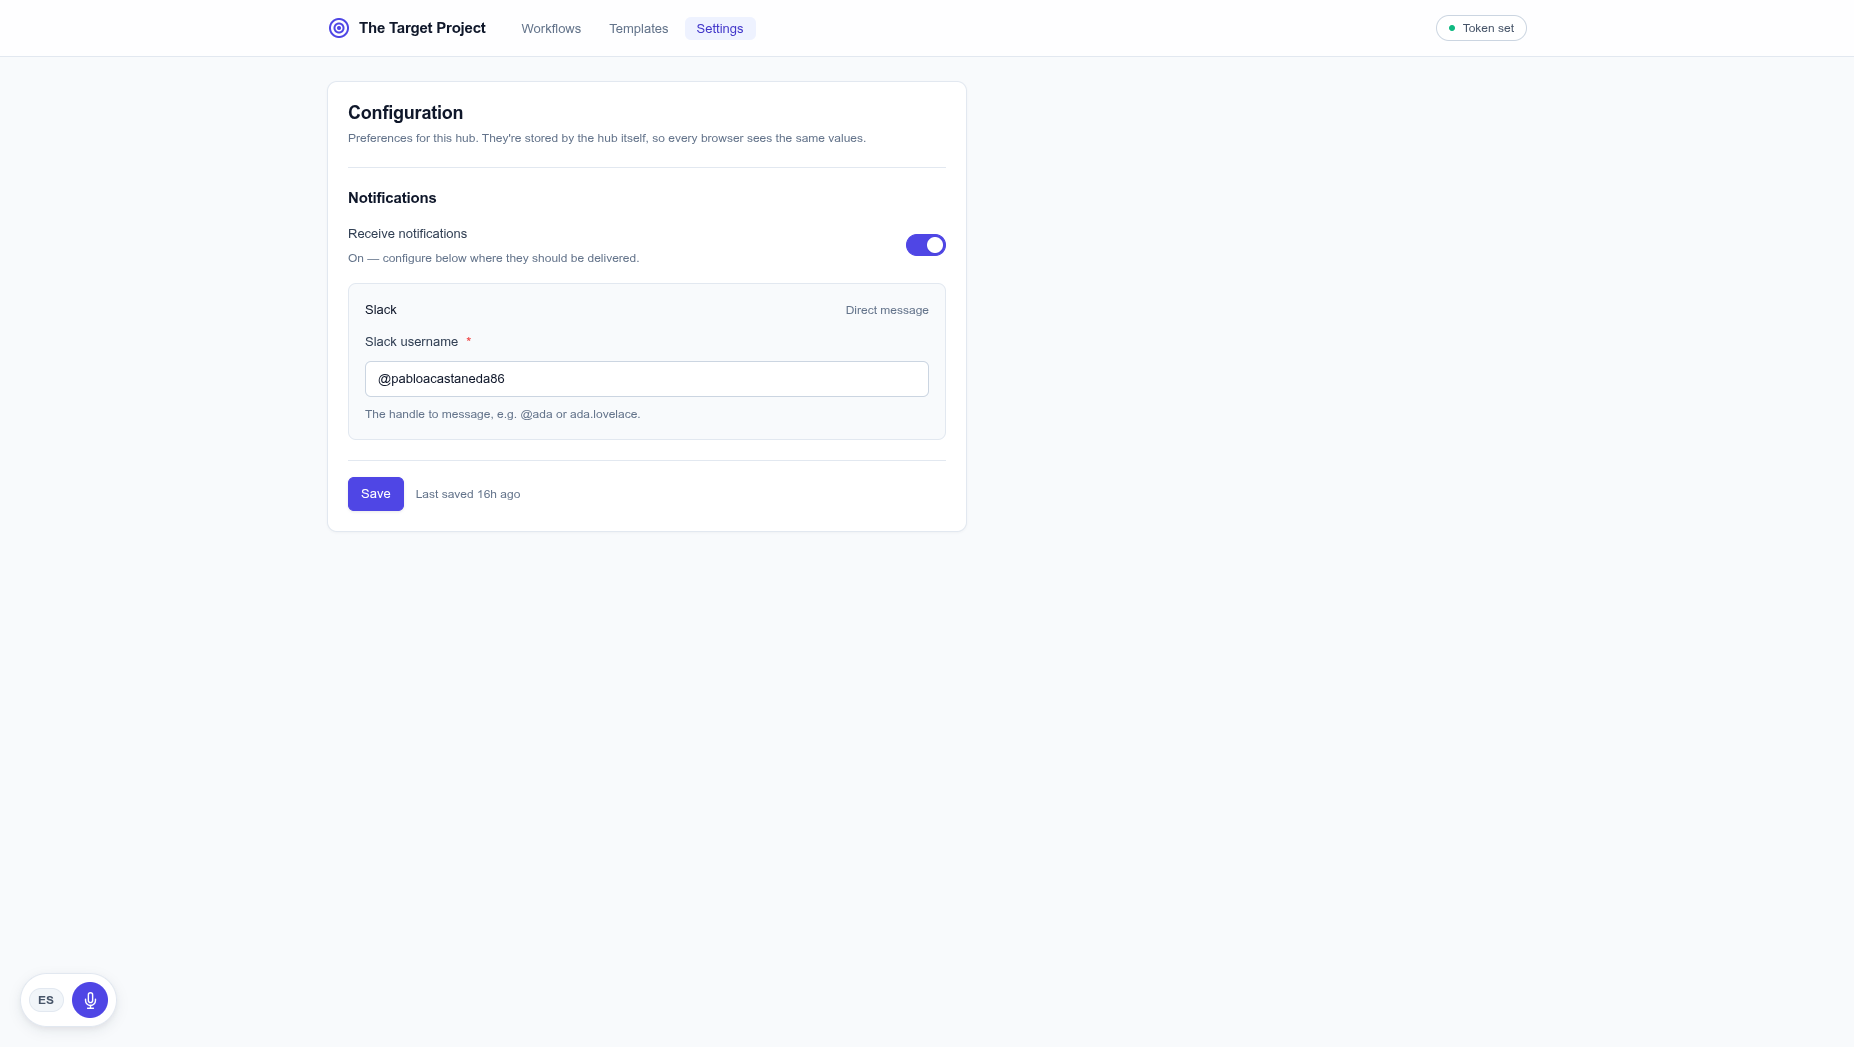
The Settings tab. A master switch and, when it’s on, the Slack username to message. Preferences are stored by the hub, so every browser sees the same values; one Save commits them together.
how it reaches Slack
The hub talks to the same Slack MCP server the agent does, using the OAuth token Claude Code stores in ~/.claude/.credentials.json. If that login can’t be confirmed, nothing is sent — delivery is strictly advisory and never affects the workflow’s state.
Ajustes y notificaciones
La pestaña Settings guarda las preferencias globales del
hub. Ahora mismo hay una sección: Notifications. Activa el
interruptor principal, escribe tu usuario de Slack y guarda — el hub te
mensajeará (un mensaje directo en Slack) cuando un paso entre en
waiting para tu revisión, y de nuevo cuando un flujo
termine.
La pestaña Settings. Un interruptor principal y, al estar activo, el usuario de Slack a quien mensajear. Las preferencias las guarda el hub, así que todos los navegadores ven los mismos valores; un único Save las confirma juntas.
cómo llega a Slack
El hub habla con el mismo servidor MCP de Slack que el agente, usando el token OAuth que Claude Code guarda en ~/.claude/.credentials.json. Si no se puede confirmar esa sesión, no se envía nada — la entrega es estrictamente informativa y nunca afecta el estado del flujo.
Rich text inputs
Every multi-line field — step descriptions, acceptance criteria, the
conversation context, template steps — has a small expand
button in its corner. Click it to open a larger editor with a formatting toolbar:
bold, italic, headings, and bulleted or numbered lists.
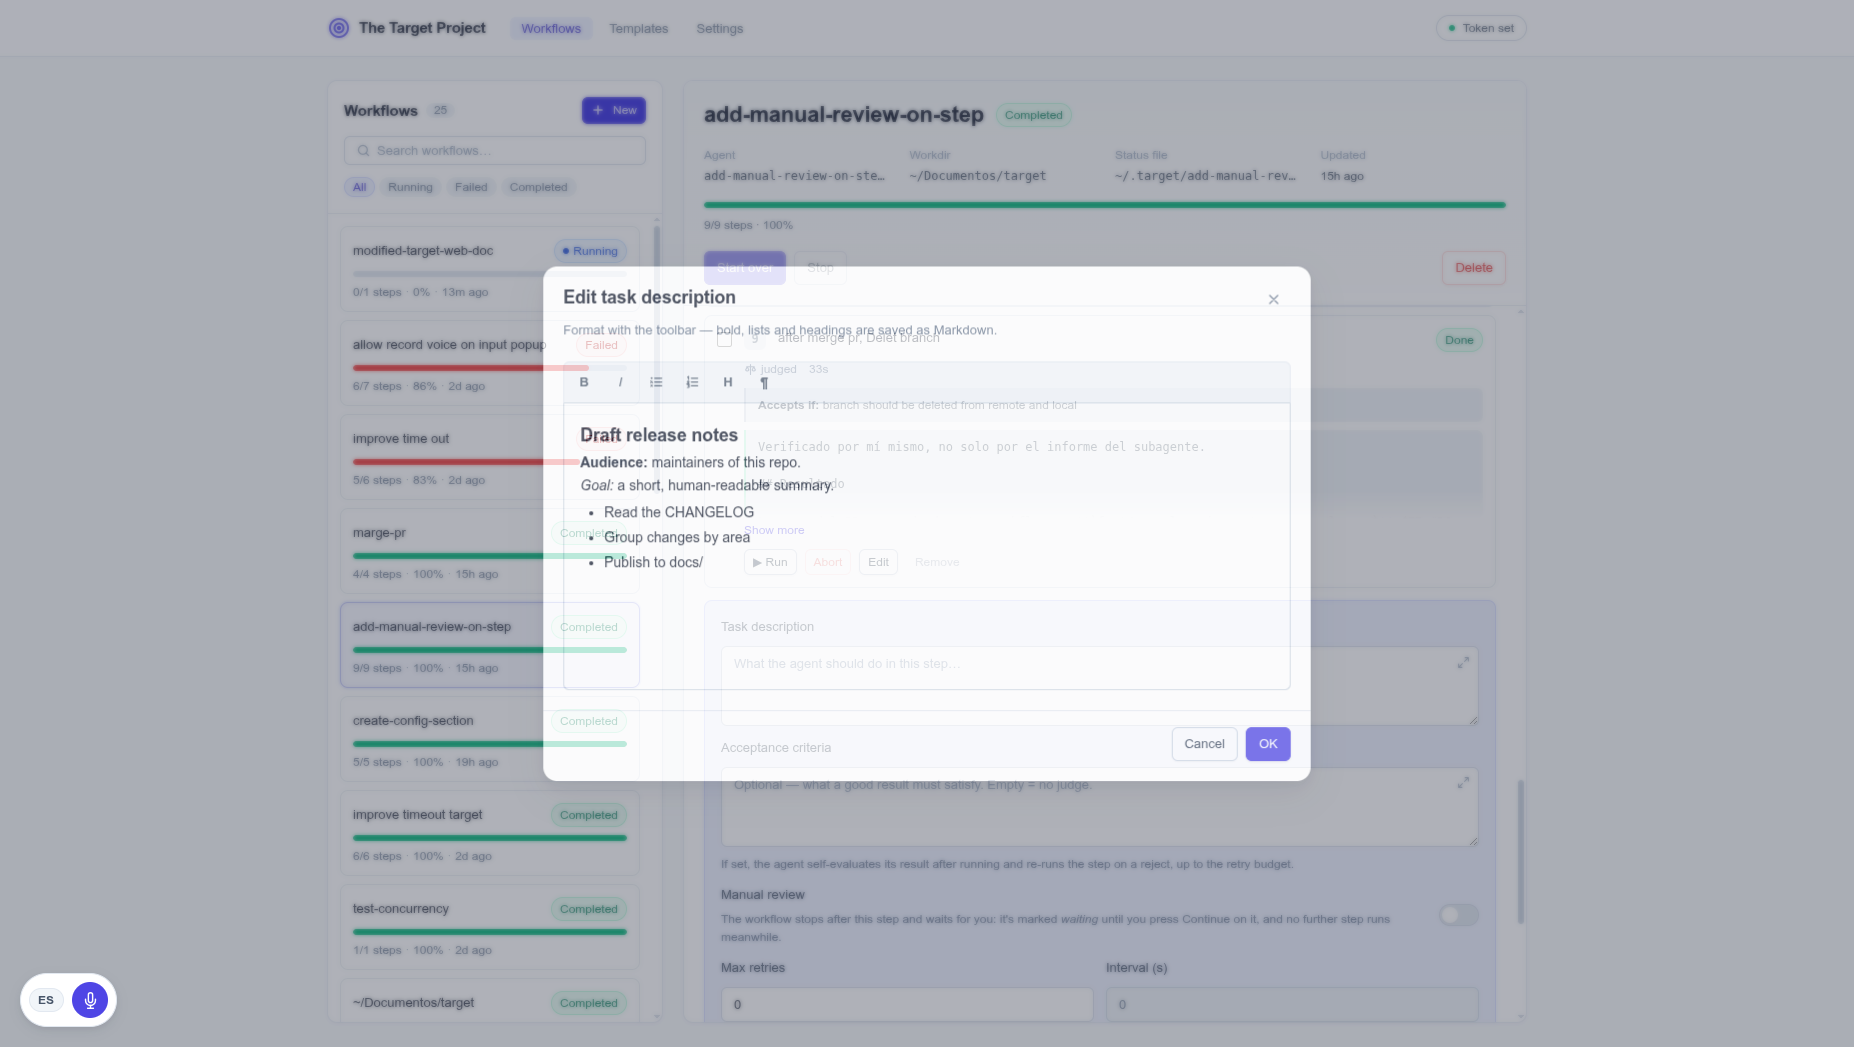
The rich-text popup. A comfortable editor with a formatting toolbar. Press OK to write the result back into the field; Cancel (or Escape) discards the popup’s edits. The text is stored as Markdown, since everything here becomes plain text handed to the agent.
On OK the edited text is serialized to Markdown
(**bold**, - bullets, # headings) and written
back through the field’s normal save path. The button hides itself while a
field is read-only — for example, a conversation context that’s already
locked.
Entradas de texto enriquecido
Cada campo multilínea — descripciones de pasos, criterios de
aceptación, el contexto de conversación, pasos de plantilla —
tiene un pequeño botón de expandir en su esquina.
Crícalo para abrir un editor más grande con una barra de formato:
negrita, cursiva, encabezados y listas con viñeta o
numeradas.
El popup de texto enriquecido. Un editor cómodo con una barra de formato. Presiona OK para escribir el resultado de vuelta en el campo; Cancel (o Escape) descarta los cambios del popup. El texto se guarda como Markdown, ya que todo aquí se vuelve texto plano que se le entrega al agente.
Al presionar OK el texto editado se serializa a Markdown
(**negrita**, viñetas con - , encabezados con
#) y se escribe de vuelta por la ruta de guardado normal del campo. El
botón se oculta mientras un campo es de solo lectura — por ejemplo, un
contexto de conversación que ya está bloqueado.
Safety: timeouts, permissions and abort
A step is timed out for going quiet, not for taking long
A running step isn’t failed on a wall clock. The hub watches the
files the agent writes while it works (Claude transcripts — subagent
transcripts included — free-code session files, and the run log) and only
declares a timeout when nothing has changed for
stepIdleTimeoutMs (default 10 minutes), or when the step blows past the
absolute ceiling stepHardTimeoutMs (default 6 hours) however busy it
looks. A step that’s genuinely working is left alone for as long as it keeps
working.
Queued steps have a fair clock
A step queued behind another on the same repo isn’t timed out
while it waits its turn — its clock starts only when the broker reports the
run actually began. A separate queuedTimeoutMs (default 6h) is the
safety net for a broker that never calls back.
Permissions are opt-in
By default an agent can answer but can’t write files or run commands. Writing
needs acceptEdits at creation, scoped to that agent’s own sandbox.
bypassPermissions removes every check and demands an explicit risk
confirmation.
Abort a stuck step
If a step’s dispatch never calls back, it blocks everything — ▶
won’t re-run an in-flight step and restart is disabled while the workflow is
running. The Abort button force-fails just that step (preserving
its session so Open conversation still works) and kills the spawned agent
process on the broker, freeing the workdir lock so other workflows on the same repo
can proceed. Then ▶ re-run it.
local only
The hub binds to 127.0.0.1 — nothing listens on the network. Every mutating route needs the admin token (a Bearer header, checked with a timing-safe comparison), and the agent’s result callbacks are authenticated with a random per-step token instead.
Seguridad: tiempos de espera, permisos y abort
Un paso se cancela por quedarse quieto, no por tardar
Un paso running no se falla por un reloj de pared. El hub vigila los
archivos que el agente escribe mientras trabaja (transcripciones de Claude —
incluidas las de subagentes —, archivos de sesión de free-code y el log
de ejecución) y solo declara timeout cuando nada ha cambiado
durante stepIdleTimeoutMs (10 minutos por defecto), o cuando el paso
supera el techo absoluto stepHardTimeoutMs (6 horas por defecto) por
muy activo que se vea. Un paso que está trabajando de verdad se deja en paz
mientras siga trabajando.
Los pasos en cola tienen un reloj justo
Un paso queued detrás de otro sobre el mismo repo no se cancela
mientras espera su turno — su reloj arranca solo cuando el broker reporta que
la ejecución realmente comenzó. Un queuedTimeoutMs aparte
(6 h por defecto) es la red de seguridad para un broker que nunca responde.
Los permisos son opt-in
Por defecto un agente puede responder pero no escribir archivos ni ejecutar comandos.
Escribir requiere acceptEdits al crear, acotado al sandbox propio del
agente. bypassPermissions quita todo chequeo y exige una
confirmación de riesgo explícita.
Aborta un paso atascado
Si el despacho de un paso nunca responde, bloquea todo — ▶ no reejecuta
un paso en vuelo y restart se deshabilita mientras el flujo está corriendo. El
botón Abort falla solo ese paso (preservando su sesión
para que Open conversation siga funcionando) y mata el proceso del agente en
el broker, liberando el lock del workdir para que otros flujos sobre el mismo repo
puedan continuar. Luego ▶ lo reejecutas.
solo local
El hub se bindea a 127.0.0.1 — nada escucha en la red. Cada ruta que muta necesita el token de administrador (cabecera Bearer, comparada con timing-safe), y los callbacks de resultado del agente se autentican con un token aleatorio por paso en su lugar.
Install & run
It runs straight from the repo checkout (not on npm). Needs Node 24+.
git clone <this repo> && cd target
npm run target:install
That one command installs the hub, builds the web UI, and vendors
agent-webhook-bridge (gitignored) — idempotent, safe to re-run.
Set AWB_DIR to reuse an existing awb clone instead.
npm start
Brings up both the awb broker (127.0.0.1:8890) and the
hub (127.0.0.1:8893), waits for both ports, and opens the UI in your
browser. It holds the foreground; Ctrl-C stops them together. The
hub prints its admin token on startup — the UI asks for it once, the CLI reads
it from config automatically.
where state lives
Everything lives under ~/.target/: config.json, the SQLite target.db, a sandbox per agent, and a <slug>-<id>.md progress file per workflow (rewritten on every change). Set TARGET_HOME=/your/path before any command to use a different location.
Instalar y ejecutar
Se ejecuta directo desde el checkout del repo (no está en npm). Necesita Node 24+.
git clone <este repo> && cd target
npm run target:install
Ese único comando instala el hub, construye la interfaz web y trae
agent-webhook-bridge (gitignored) — idempotente, seguro de
reejecutar. Pon AWB_DIR para reutilizar un clone de awb existente.
npm start
Levanta ambos: el broker awb (127.0.0.1:8890) y el hub
(127.0.0.1:8893), espera ambos puertos y abre la interfaz en el
navegador. Mantiene el primer plano; Ctrl-C los detiene juntos. El
hub imprime su token de administrador al iniciar — la interfaz lo pide una vez,
el CLI lo lee de la config automáticamente.
dónde vive el estado
Todo vive bajo ~/.target/: config.json, el SQLite target.db, un sandbox por agente y un archivo de progreso <slug>-<id>.md por flujo (reescrito en cada cambio). Pon TARGET_HOME=/tu/ruta antes de cualquier comando para usar otra ubicación.
Quick reference
The target CLI
Command
What it does
target create <name>
Creates a workflow (+ its agent/hook). Flags: --workdir, --permission-mode, --runner claude|free-code, --yes-bypass-risk.
target set-context <id> "<text>"
Sets (or clears, with "") the conversation context.
target add-step <id> <description>
Appends a step.
target list / target show <id>
List workflows / show a workflow’s steps.
target run <id>
Start (or continue) sequential dispatch.
target pause / resume / restart <id>
Stop dispatching / undo a pause / reset every step and start over.
If target isn’t linked, every command works as node hub/cli.ts … from the repo root.
Boots awb + the hub, opens the UI, holds the foreground.
npm test
Runs the hub’s tests against a throwaway TARGET_HOME.
npm run typecheck
Type-checks the hub and the UI.
npm run ui:dev
Vite dev server on :5173 with hot reload, proxying /api to a hub started separately.
npm run ui:build
Builds the UI into hub/ui/dist.
How a step flows
hub -> POST to the workflow's awb hook {stepId, input, callbackUrl, startedCallbackUrl} + secret, session to resume
awb -> queued (waiting on the workdir lock) serialized per workdir; the lock survives broker restarts
awb -> POST startedCallbackUrl {started:true} the instant the lock is acquired
hub -> step running (idle clock starts here)
awb -> spawns claude or free-code the step's description, with the subagent instruction appended
awb -> POST callbackUrl {ok, result, session_id} when the run finishes
hub -> step done . judging . or waiting done if no criteria; judging if it has them; waiting if gated
hub -> next selected step dispatched until none remain, then the workflow is completed
Configuration (~/.target/config.json)
Field
Default
Meaning
host / port
127.0.0.1 / 8893
Bind address and port (kept away from awb’s 8890).
adminToken
random, on first run
Bearer token for every mutating route. Printed at startup.
stepIdleTimeoutMs
600000 (10 min)
No sign of progress for this long → stalled. This is the timeout that matters.
stepIdleWarnMs
180000 (3 min)
When the UI starts showing a step as idle. Display only.
stepHardTimeoutMs
21600000 (6 h)
Absolute ceiling from started_at, however active.
queuedTimeoutMs
21600000 (6 h)
A queued step whose run never started.
maxInputBytes
65536 (64 KiB)
Request body cap; oversized bodies get 413.
HTTP API (the routes the UI and CLI use)
Endpoint
What it does
GET /api/workflows
List workflows with progress % (expires stale steps first).
POST /api/workflows
Create a workflow (+ its hook). Body: {name, workdir?, permissionMode?, runner?, acceptBypassRisk?, templateId?}.
GET /api/workflows/:id
Workflow detail + its steps.
PATCH /api/workflows/:id/context
Set or clear the conversation context.
POST /api/workflows/:id/steps
Add a step. Body: {description, acceptanceCriteria?, maxRetries?, retryIntervalSeconds?, manualReview?}.
POST /api/workflows/:id/steps/:stepId/run
Run one step now, out of order, on a fresh session.
POST /api/workflows/:id/steps/:stepId/abort
Force-fail a stuck step, preserving its session, and kill the agent process on the broker.
POST /api/workflows/:id/steps/:stepId/continue
Release a step’s manual-review hold.
POST /api/workflows/:id/start | pause | resume | restart
Run control. Optional {stepIds: [...]} to restrict which steps run.
GET/POST/PUT/DELETE /api/templates[/:id]
List, create, update and delete templates.
GET/PUT /api/settings/notifications
Read and save the notification preferences.
POST /api/steps/:id/result
awb’s result callback (per-step ?token=, not the admin token).
Referencia rápida
El CLI target
Comando
Qué hace
target create <nombre>
Crea un flujo (+ su agente/hook). Flags: --workdir, --permission-mode, --runner claude|free-code, --yes-bypass-risk.
target set-context <id> "<texto>"
Establece (o limpia, con "") el contexto de conversación.
target add-step <id> <descripción>
Agrega un paso al final.
target list / target show <id>
Lista flujos / muestra los pasos de un flujo.
target run <id>
Inicia (o continúa) el despacho secuencial.
target pause / resume / restart <id>
Detener el despacho / deshacer una pausa / resetear todos los pasos y empezar de nuevo.
Si target no está enlazado, cada comando funciona como node hub/cli.ts … desde la raíz del repo.
Scripts npm útiles
Script
Qué hace
npm run target:install
Bootstrap en un comando (hub + build de UI + awb). Idempotente.
npm start
Levanta awb + el hub, abre la interfaz, mantiene el primer plano.
npm test
Ejecuta los tests del hub contra un TARGET_HOME desechable.
npm run typecheck
Verifica tipos del hub y de la interfaz.
npm run ui:dev
Servidor dev de Vite en :5173 con hot reload, proxyando /api a un hub levantado aparte.
npm run ui:build
Construye la interfaz en hub/ui/dist.
Cómo fluye un paso
hub -> POST al hook awb del flujo {stepId, input, callbackUrl, startedCallbackUrl} + secreto, sesión a retomar
awb -> queued (esperando el lock del workdir) serializado por workdir; el lock sobrevive a reinicios del broker
awb -> POST startedCallbackUrl {started:true} en el instante en que se adquiere el lock
hub -> paso running (aquí arranca el reloj de inactividad)
awb -> lanza claude o free-code la descripción del paso, con la instrucción de subagente añadida
awb -> POST callbackUrl {ok, result, session_id} cuando termina la ejecución
hub -> paso done . judging . o waiting done si no hay criterios; judging si los tiene; waiting si tiene puerta
hub -> se despacha el siguiente paso seleccionado hasta que no queden, entonces el flujo queda completed
Configuración (~/.target/config.json)
Campo
Por defecto
Significado
host / port
127.0.0.1 / 8893
Dirección y puerto (separados del 8890 de awb).
adminToken
aleatorio, en la primera ejecución
Token Bearer para cada ruta que muta. Se imprime al iniciar.
stepIdleTimeoutMs
600000 (10 min)
Sin señales de progreso durante este tiempo → atascado. Este es el timeout que importa.
stepIdleWarnMs
180000 (3 min)
Cuando la interfaz empieza a mostrar un paso como inactivo. Solo visual.
stepHardTimeoutMs
21600000 (6 h)
Techo absoluto desde started_at, por muy activo que esté.
queuedTimeoutMs
21600000 (6 h)
Un paso queued cuya ejecución nunca empezó.
maxInputBytes
65536 (64 KiB)
Límite del cuerpo de la petición; los excesivos reciben 413.
API HTTP (las rutas que usan la interfaz y el CLI)
Endpoint
Qué hace
GET /api/workflows
Lista flujos con % de progreso (expira los pasos rancios primero).
POST /api/workflows
Crea un flujo (+ su hook). Body: {name, workdir?, permissionMode?, runner?, acceptBypassRisk?, templateId?}.
GET /api/workflows/:id
Detalle del flujo + sus pasos.
PATCH /api/workflows/:id/context
Establece o limpia el contexto de conversación.
POST /api/workflows/:id/steps
Agrega un paso. Body: {description, acceptanceCriteria?, maxRetries?, retryIntervalSeconds?, manualReview?}.
POST /api/workflows/:id/steps/:stepId/run
Ejecuta un paso ahora, fuera de orden, en una sesión nueva.
POST /api/workflows/:id/steps/:stepId/abort
Falla forzadamente un paso atascado, preservando su sesión, y mata el proceso del agente en el broker.
POST /api/workflows/:id/steps/:stepId/continue
Libera la retención de revisión manual de un paso.
POST /api/workflows/:id/start | pause | resume | restart
Control de ejecución. Opcional {stepIds: [...]} para acotar qué pasos se ejecutan.
GET/POST/PUT/DELETE /api/templates[/:id]
Listar, crear, actualizar y eliminar plantillas.
GET/PUT /api/settings/notifications
Leer y guardar las preferencias de notificación.
POST /api/steps/:id/result
Callback de resultado de awb (?token= por paso, no el token de administrador).